
Equipment2 min read5-question check
Grid conversion
Grid conversion factors, not grid ratios, tell you how much to change mAs when the grid changes.
The rule
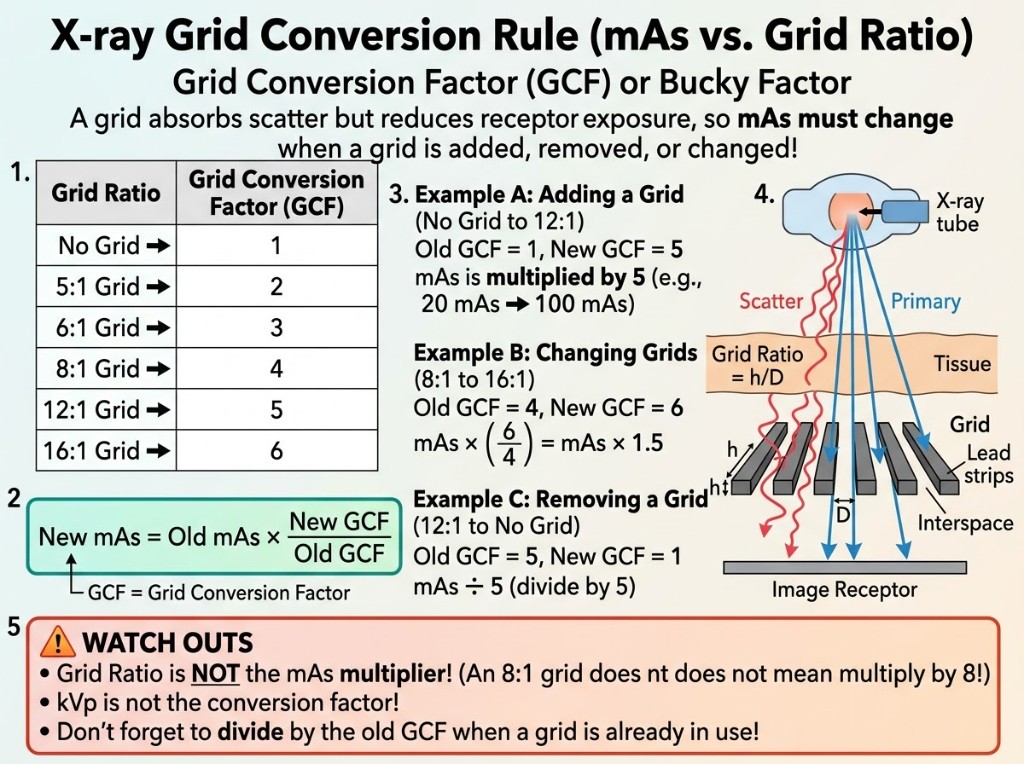
When you add a grid, remove one, or switch to a different ratio, mAs must change to keep receptor exposure the same. The multiplier is the grid conversion factor, often called the Bucky factor. Learn the standard values: no grid is 1, a 5:1 grid is 2, a 6:1 grid is 3, an 8:1 grid is 4, a 12:1 grid is 5, and a 16:1 grid is 6.
Why it happens
A grid's lead strips absorb most of the scatter leaving the patient, but they also stop some primary photons. Fewer photons reach the receptor, so the exposure indicator drops unless mAs goes up. Higher ratio grids absorb more, so their factors are larger. The extra mAs means extra patient dose, so a grid is used only when the part is thick enough to make meaningful scatter, generally more than about 10 cm.
The numbers
The formula is new mAs equals old mAs times the new factor divided by the old factor. Example one: a knee done tabletop at 4 mAs moves to the 12:1 Bucky. Multiply by 5 over 1, so the new technique is 20 mAs. Example two: an abdomen at 20 mAs with a 12:1 grid is repeated on a mobile unit with an 8:1 grid. Multiply by 4 over 5, which is 0.8, so the new technique is 16 mAs. Example three: a 6:1 grid at 9 mAs is removed. Multiply by 1 over 3, giving 3 mAs.
In practice
On mobile exams you often trade a 12:1 department Bucky for a lower ratio portable grid, so expect to lower mAs, not raise it. When you remove a grid, divide by its factor. When a grid is already in use, always divide by the old factor before multiplying by the new one. The ratio itself, such as 8:1, describes the grid's construction. It is never the number you multiply by.
Clinical Example
A lateral knee is usually done tabletop at 5 mAs, but this knee measures 12 cm and the protocol calls for a grid. You move to the 12:1 table Bucky, which has a factor of 5, and set 25 mAs at the same kVp.
Common Mistakes
- Multiplying mAs by the grid ratio, such as 12 for a 12:1 grid, instead of the conversion factor of 5.
- Forgetting to divide by the old factor when switching from one grid to another.
- Raising mAs when moving to a lower ratio grid, which overexposes the patient.
- Changing kVp instead of mAs to make up for a grid.
Why It Matters
The right conversion keeps the exposure indicator in range on the first try and avoids needless dose, since every move to a higher factor raises patient exposure. The registry expects you to recall the factors and run the formula in both directions.
Key Relationships
- No grid 1, 5:1 = 2, 6:1 = 3, 8:1 = 4, 12:1 = 5, 16:1 = 6
- mAs2 = mAs1 × GCF2 / GCF1
- Higher factor → more mAs → more patient dose
- Removing a grid → divide mAs by its factor